Greenhouse gases and carbon emissions are causing a huge disruption to our ecosystem. Clean energy is rapidly gaining ground. Since 2011, two-thirds worldwide of the solar power capacity has been installed. India has remained at the forefront of clean solar power development. According to reports, India’s solar power generation increased by 86% in 2017.
Solar power is ideal for both residential and commercial applications. Although the cost of installing a solar power system has dropped steadily, you can still do it yourself to save money. This guide will show you how to install solar with solar photovoltaic (PV). You can save money. This is a detailed guide on how to build and install solar power units for your home.

How to set up a solar power unit?
Step 1 – Gather solar power components.
The first step is to gather the essential ingredients for a solar power system. You will need four main items: a solar panel, a charge controller and an inverter. You will also need a breaker, meter, MC4 connector, and fuses. It is important to read the instructions for your solar panel module carefully.
Step 2 – Calculate your power load.
It is important to calculate the amount of power you use in your home before starting the solar installation process. It’s not difficult. It would be best to take down all the appliances you use daily, such as lights, fans, televisions, and lights. Next, calculate the average time these appliances are running per day. To check your household electric appliances’ power rating and usage duration, refer to their specification chart.
Calculate the Watt-Hour by multiplying the appliance’s runtime and its power rating. This is the same process for each device. Next, add the individual watt-hour numbers, and you will get the total. An online calculator that calculates off-grid loads can simplify the calculation.
Step 3 – Select and charge the battery.
One major problem with solar power is the inability to provide electricity after the sun sets. This problem can be easily solved by using a lithium-ion or lead-acid battery. A battery, whether lead-acid or lithium-ion, stores solar energy during the day and then discharges it at night. If you choose the best battery storage capacity, this will provide a steady supply. To monitor the charging of your battery, you will need a power control unit. These are located between the battery and the panels. These controllers typically have an LED light that indicates the storm’s charging status and adjusts the power flow to it.

Step 4 – Set up the inverter.
While solar arrays generate electricity in direct current, electrical appliances require alternating current (AC) power. An inverter is a device that allows you to use electric devices without the need for adaptors. There are many inverters, including modified sine-wave and square-wave inverters. Modified sine waves can be used with certain appliances, but square waves will not work with all devices. A pure sine wave converter is the best option for your solar system.
Step 5 – Fix the solar panels on your roof.
After the controller and battery are installed, mount the solar panels. The best place for the conferences is on the roof or anywhere else that gets the sun’s radiation. Either make your mounting stand or buy it on the market. Mounting stands should be tilted to approximately equal the latitude angle at your location. Properly setting the solar panels is crucial for their operation and maintenance. It is important to ensure that solar panels face the sun all day.
Wire the solar panels in the final phase. A small junction box can be traced at the back of the solar panel. You can see the junction box’s positive and negative signs of polarity. The junction box can also have terminal wires with an MC4 connector if it is large. However, the junction box must be aligned with external cables if you have small solar panels. The black and red wires are used for the negative and positive terminal connections.
Step 6 – Connect the solar panels to the battery.
The solar panels must be connected to the battery. These panels are paired together in some PV systems so that you don’t need extra work. If you are given multiple units, connecting them in series and parallel is necessary. A series connection is made by clicking the positive terminal of a device to another device’s terminal. To make a parallel connection, connect one device’s positive terminal with another device and so forth.
7th Step: Setup for inverter & battery
Without stands for the inverter and battery, your residential solar system is not complete. You have two options: build the shelves yourself or buy them. After you have the positions for the battery and inverter set up, you can begin wiring. Wire the controller first. The controller will be connected to the solar panels via the first connection. The second connection connects the controller and the battery. The final link connects the controller to the DC load connection.
An MC4 connector is required to connect the solar panel and the charge controller. After the controller has been linked to the battery, the controller’s LED lights will light up. The inverter terminal must be connected to the battery’s terminal.
These steps will help you set up a home solar power unit. You can save money on the high cost of installing one later because solar energy is both clean and a good investment.

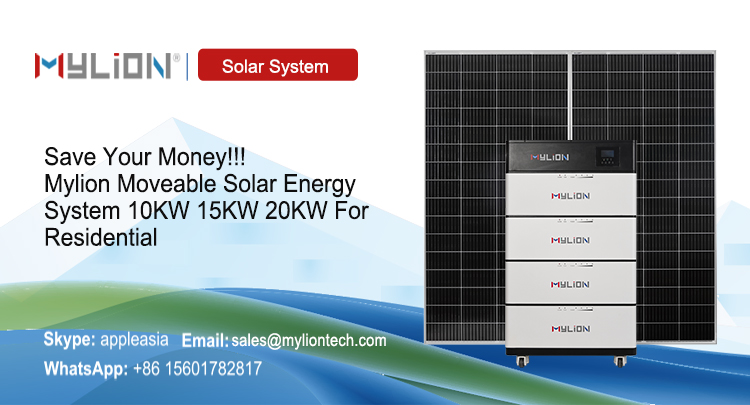
What is Mylion 10KW Solar Power Kit ?
- Solar Panel 3600W
- Solar Hybrid Inverter Off Grid 10KVA/10000W
- LiFe PO4 Battery 48V200Ah
- Free accessories: cable, MC4 connector,mounting bracket and tool bag
- Full charge time: about 4hours sun shine time
- Loading time: about 7-8hours For Residential-Light(50W)&TV(100W)&Computor(200W)&air condition(1000W)
Who is Mylion?
Mylion is a manufacturer of mini UPS,solar energy system,lithium-ion battery and Nimh battery’s research and development, production and sales. The main export market of our lithium-ion battery are Europe and America. We offer our customers very high quality lithium battery with competitive price and the best service. Over the years, our product quality has earned good reputation from well-known enterprises in different market of the world.
Mylion produce a series battery pack, lithium battery, nimh battery, LiFe PO4 battery, lithium polymer battery, wireless power bank, rc lipo battery, mini UPS etc. Widely used for portable electric products, smart AI robot, make people’s life to be convenient, smart.